This
is the traditional paper airplane, the old stand-by of many a young schoolboy.
No one is quite sure of the exact history of the plane, but according to
oral tradition, and my great uncle Melton, it goes all the back to the
days of ancient Egypt. As he tells it a couple of semi- delinquent schoolboys
had just finished their class on; Pyramids and Triangles what they can
do for you. Now as only such scholarly type lads can do they began thinking
about and experimenting with triangles in their very next class; Ancient
History Now! How to make people remember you in a few thousand years. Well
with a few sheets of papyrus and a fold here and a triangle there before
they knew it, presto! papyrus airplane. Just as one might expect, Uncle
Melton would say, those boys invented something else that day as well,
detention. Of course thats what Uncle Melton would say.
Anyway
for those of you who missed out on those exciting days and are clawing
in a futile attempt to relive them, or if its just been a few to many beers
and years since you flew one of these reminiscent beauties here your answer.
Step by- step instructions on how to build the classroom classic.
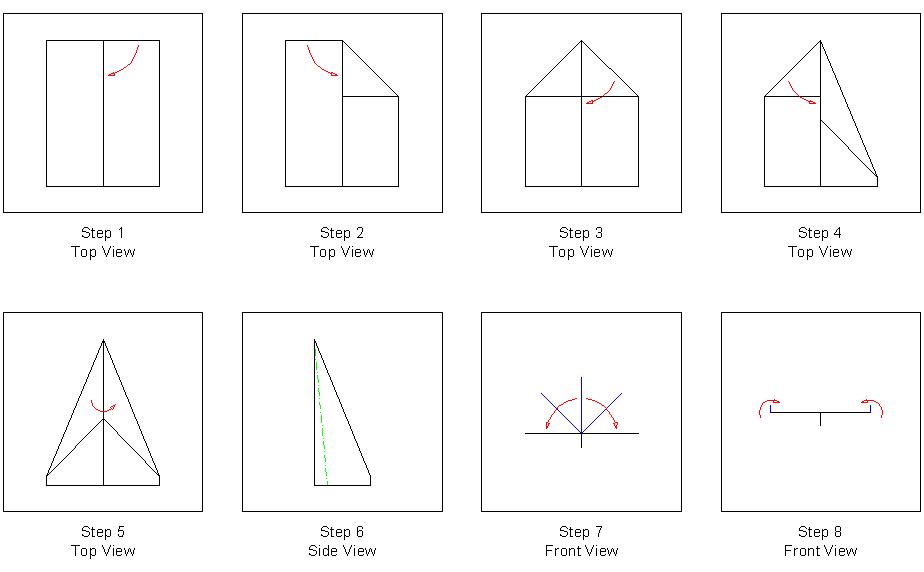
First
acquire a sheet of paper. Any size will do, doodles already on the sheet
are a big plus. After this fold the sheet in half-length wise, creasing
it (See Figure 1). Now you get to start making those triangles. Take any
of the four corners and fold it inside towards the crease. Next fold the
opposite corner towards the crease in the same manner (See Figure 2&3).
Now take the outside edge of one of the one of the two little triangles
formed and fold it to the crease. Next fold the opposite corner towards
the crease in the same manner. (See Figure 4&5). Lets take a little
break, Ahhh! Now that your refreshed fold the plane in half back along
the crease keeping the other folds in place. After this fold both sides
down and crease about an inch from the bottom (See Figure 6&7). The
objective of this fold is to create the wings and an area underneath to
grip. For a finishing touch fold up the ends of the wing tips about half
an inch to add some cool style points. Finally fly and enjoy. |