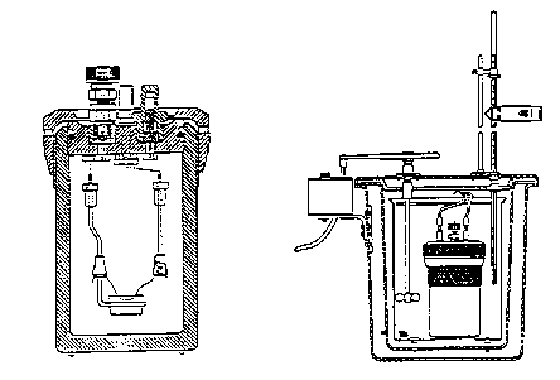
Figure 1. Oxygen Bomb Calorimeter
LAB 2 - HEATING VALUE OF FUEL
Introduction
Combustion is one of the most important chemical reactions in today's energy seeking world. The combustion process involves the oxidation of constituents in the fuel. The heat liberated during this reaction is called the heat of combustion, and the amount of heat corresponding to a unit mass of the fuel is called the heating value. The terms Higher Heating Value (HHV) and Lower Heating Value (LHV) are used to distinguish cases in which water in the combustion products is either liquid (HHV) or gaseous (LHV). The difference between these two values may be written as
where m is the mass of water produced per unit mass of fuel and hfg is the latent heat of vaporization of water at the standard reference state.
Fuels
Fuels are classified according to the phase in which they normally exist. The gaseous fuels are mixtures of simple chemical substances while the liquid fuels contain more complex molecules and solid fuels often have very complicated chemical structure. All three types of fuels consist basically of three elements undergoing oxidation (C, H2, S) plus one oxidant (O2) and other inactive elements. Tables 1 - 3 lists the constituents and heating values of several common gaseous, liquid, and solid fuels, respectively.
|
|
|
|
|
|||||||
|
|
|
|
|
|
|
|
|
|
|
|
|
|
|
|
|
|
|
|
|
|
|
|
|
|
|
|
|
|
|
|
|
|
|
|
|
|
|
|
|
|
|
|
|
|
|
|
|
|
|
|
|
|
|
|
|
|
|
|
|
|
|
|
|
|
|
|
|
|
|
|
|
|
|
|
|
|
|
|
|
|
|
|
|
|
|
|
|
||||||
|
|
|
|
|
|
|
|
|
|
|
|
|
|
|
|
|
|
|
|
|
|
|
|
|
|
|
|
|
|
|
|
|
|
|
|
|
|
|
|
|
|
|
|
|
|
|
|
|
|
|
|
|
|
|
|
|
|
|
|
|
|
|
|
|
|
|
|
|
|
|
|
|
|
|
|
|
|
|
|
|
|||||||
|
|
|
Matter |
Carbon |
|
|
|
|
|
|
|
|
|
|
|
|
|
|
|
|
|
|
|
|
|
|
|
|
|
|
|
|
|
|
|
|
|
|
|
|
|
|
|
|
|
|
|
|
|
|
|
|
|
|
|
|
|
|
|
|
|
|
|
|
|
|
|
|
|
|
|
|
|
|
|
|
|
|
|
|
|
|
|
|
|
|
|
|
|
|
|
|
|
|
|
|
|
|
|
|
|
|
|
|
|
|
|
|
|
Measurement of Heating Value
Calorimeters provide the engineer a simple means of measuring the heating values of fuels. There are two basic types of calorimeters: a steady-flow calorimeter to measure the heating value of gaseous fuels and the bomb calorimeter (constant-volume) for use with liquid and solid fuels. Figure 1 shows a typical oxygen bomb calorimeter. The solid/liquid fuel sample is placed in the crucible and the bomb is subsequently pressurized with pure oxygen. Ignition is accomplished by passing a current through a wire in contact with the fuel. When combustion is complete, the temperature rise of the bomb and its surrounding water bath is measured.
Since the temperature rise is only a few degrees, the system can be considered to be isothermal. Losses to the surroundings could be determined by a method prescribed by the bomb calorimeter manufacturer; however, the use of an adiabatic bomb calorimeter eliminates losses to the surroundings and results in more accurate heating values. In the adiabatic calorimeter, a water jacket surrounds the bomb and the calorimeter water bucket. As the temperature of the bomb and water bucket rises following combustion, the temperature of the surrounding water jacket is controlled such that it equals that of the bomb and water bucket. Thermistors and a wheatstone bridge control the flow of both hot and cold water to the water jacket permitting the jacket temperature to follow the increasing temperature of the bomb and bucket.
It should be noted that since the experiment is at constant volume rather than constant pressure, the change in internal energy (V = constant) is being measured rather than the change in enthalpy (p = constant). These quantities differ by an amount proportional to the difference between the number of moles of the combustion products and the number of moles of the reactants. Further, the conditions of the experiment are usually such that most of the steam condenses resulting in a heating value that nearly equals the HHV. Since only a small, but calculable, proportion of the steam remains in the vapor phase, a small correction could be applied.
Objective
Determine the higher heating value (HHV) of unleaded gasoline (or a similar fuel supplied by the instructor) using the adiabatic oxygen bomb calorimeter.

Equipment List
adiabatic calorimeter
2 high precision thermometers (24 - 30°C)
drive belt
site magnifying glasses
calorimeter bucket
1108 oxygen bomb
screw cap
bomb cylinder
bomb head
lifting handle
crucible
oxygen tank
fuse wire
Parr oxygen regulator and filling apparatus
2000 grams distilled water
safety glasses*
watch*
wire cutters
paper towels
Shop-Vac vacuum cleaner
hot water supply
cold water supply
*supplied by students
Precautions
1. Do not put a sample in the bomb that will react explosively or which weighs more than 1.5 grams (usually a good sample size is less than 1.1 grams).
2. Do not overcharge the bomb with oxygen. The initial charge should not exceed 40 atm (519 psig). The usual charging pressure is 30 atm.
3. Make sure the bomb is completely submerged and electrodes attached before firing.
4. Stand clear of the bomb during firing and do not handle the bomb until the water temperature reaches steady state.
5. When opening the top of the calorimeter, be sure to first pick up the lever that moves the thermometer, stirrer, and thermistor out of the bucket. Make sure the site glasses are removed before opening or closing the top of the calorimeter.
6. Do not move the knob on the control panel. It has been preset and should not be adjusted. Also, do not adjust the control valves in the back of the calorimeter as this may cause the calorimeter to overflow.
Initialization Procedure
1. The hot water and cold water lines should already be connected.
2. Heat the distilled water to a temperature between 24 and 27°C. This initial temperature is in the lower half of the range of the bucket and jacket thermometers (range = 24 - 30°C). The gallon of distilled water can be placed inside a bucket of hot water until the desired temperature is attained. A second method requires step 3 to be performed, followed by the heating of the calorimeter bucket inside of a larger bucket of hot water. This method is the quickest means of obtaining the initial temperature but the distilled water can easily overheat or extra water may be introduced into the calorimeter bucket.
3. Fill the calorimeter bucket with 2000 grams of distilled water (tap water may be used but distilled is preferred). A graduated cylinder or a scale can be used to measure the correct amount of water. The manufacturer specifies that the water be measured to ±0.5 grams, but this accuracy may be difficult with the available equipment. If the distilled water is being heated after it is placed in the calorimeter bucket, be sure no water is spilled or added to the calorimeter bucket and that all the water droplets are removed from the outside of the calorimeter bucket.
4. Place the calorimeter bucket such that the indentations on the bottom of the calorimeter bucket align with the plastic pegs on the bottom of the calorimeter.
5. Place the bomb head on the bomb head support stand as shown in Figure 2.
6. Place the bomb cylinder in the clamp that is affixed to the table. Use the provided hex key to tighten the clamp.
7. Use the scale in BH118C to measure fuel weights. DO NOT ATTEMPT TO MOVE OR BALANCE THIS SCALE. If your sample is solid (e.g., wood) then a capsule is not needed, but if the sample is granular (e.g., coffee) or liquid, the fuel must be enclosed in a gelatin capsule.
a) Zero the scale (tare) if a value other than 0.0000 is indicated.
b) Weigh the empty gelatin capsule or the solid fuel (no capsule is required).
c) Place the fuel in the capsule and weigh the capsule and fuel.
d) Turn the scale off when the weighing is completed.

8. Cut a 10 cm length of fuse wire and weigh it. If more is needed in order to securely wrap around the capsule, cut another piece but be sure to weigh the piece on the electronic scale. Twist the fuse wire around the gelatin capsule.
9. Attach the fuse wire to the bomb head through the eyelet holes, as shown in Figure 2.
10. Carefully place the crucible in the ring. Make sure the fuse wire does not touch any part of the crucible.
11. If the fuel is solid, place the fuel below the fuse wire so that the fuse wire touches the top of the fuel. If the fuel is in a capsule, place the wire wrapped capsule in the crucible. The fuse wire should not be contacting the crucible.
12. Carefully remove the bomb head from the stand and place in the cylinder. Carefully push straight down on the cylinder until the O-ring is below the top surface.
13. Place the screw cap on the cylinder and turn until tight.
14. Close the thumb screw on the bomb head.
15. Attach the thumb screw connector (female threads) from the oxygen filling unit onto the check valve on the bomb head (the valve with the male threads). Tighten the thumb screw.
16. PUT ON SAFETY GLASSES!! Turn on the main oxygen valve fully open (the one directly connected to tank - not the one on the regulator).
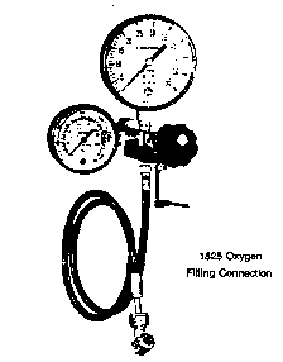
17. Make sure the relief valve lever is horizontal, as shown in Figure 3. Open the regulator valve not more than 1/4 turn to slowly fill the bomb. When the pressure reaches 30 atm, turn off the valve on the regulator.

18. Open the relief valve (pull down) to purge the oxygen still in the line.
19. Unscrew the oxygen filling connection from the bomb head.
20. Carefully loosen the hex screw to release the bomb from the clamp.
21. Attach the lifting handle in the two holes on the outside of the screw cap. Insert the bomb into the calorimeter bucket, placing it above the circular indentation on the bottom of the bucket. Insert the two electrodes into the terminals on the bomb head.
22. Swing the calorimeter cover over the bomb and lower the thermometer into the calorimeter bucket.
Combustion Procedure
1. Turn on the power switch. If the temperature of the bucket is greater than the temperature of the jacket, the red and/or orange lights at the upper portion of the controller will light up. The red light indicates maximum flow of hot water into the jacket while the orange light indicates low flow of hot water into the jacket. The white light indicates low flow of cold water into the jacket. When the temperature of the jacket approaches the temperature of the bucket, the red light will turn off and only the low flow of hot water will be utilized. When the temperature of the jacket finally equals the temperature of the bucket, the low flow hot and low flow cold water valve solenoids will alternately click on and off. This control process maintains the jacket water temperature equal to the bucket water temperature.
2. Allow the calorimeter to run for about 4 to 5 minutes after temperature equalization has been achieved.
3. Record the water temperature of the bucket on the lab sheet to the nearest 0.005°C.
4. Stand back from the calorimeter and fire the bomb by pressing the ignition button. Hold the button down for approximately 5 seconds. The red light will blink one time indicating that the fuse wire has burned.
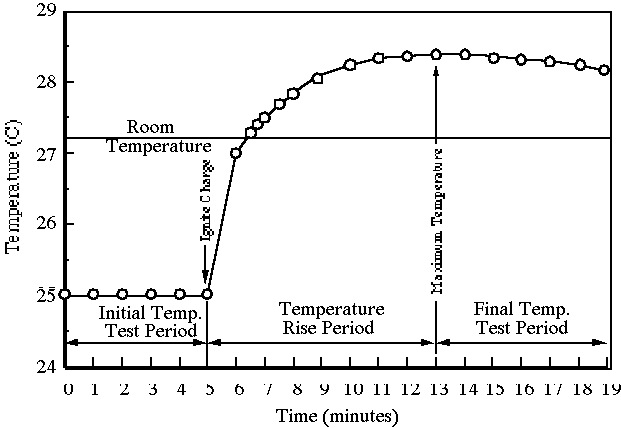
5. Record the water bucket temperature every 30 seconds. A graph of the temperature data should resemble Figure 4.
6. When five successive readings are exactly the same (e.g. ±0.005°C), stop recording temperature data and turn off the machine.

Final Procedure
1. Remove the sight glasses, raise the bucket thermometer, and swing the calorimeter lid to the right. Remove the electrodes from the bomb.
2. Place the bomb in the clamp and lighten with the hex key.
3. Using the Shop-Vac, vacuum the water off the top of the bomb head.
4. Open the valve knob slightly to release all residual gas pressure before attempting to remove the screw cap. Gas release should proceed slowly over a period of not less than 1 minute.
5. Loosen the screw cap and remove the bomb head by slowly lifting it straight up out of the bomb. Do not twist the head during removal. Pull it straight out to avoid sticking.
6. Place the bomb head on the stand and remove any fuse wire still remaining on the head or in the cylinder.
7. Weigh the unburned fuse wire on the electronic scale.
8. Use paper towels to clean the inside surface of the cylinder and the crucible.
9. Return the distilled water to the gallon container. Clean and dry the calorimeter bucket.
Calculations
Consider a system that consists of the sample (s), the bomb (b), and the calorimeter water (w) and bucket. The sample is contained within the bomb, which is immersed within the water contained by the calorimeter bucket. Applying the First Law of Thermodynamics to this system gives
DU = QV - W
where:
DU = the change in internal energy of the
system
QV = the heat transfer at constant volume
W = work performed on or by the system
Since there is no work crossing the system boundary, W = 0. If the entire system is adiabatic, the heat of combustion is used to change the temperature of the water and the bomb:

Assuming constant specific heats

where DT = the total temperature change of
the system.
The heat transfer is also equal to the heat of combustion of the sample
QV = (mu)s
In the case of a liquid fuel, the sample is composed of fuel (f), gelatin capsule (c), and fuse wire (fw). Therefore,
![]()
The heating value of the fuel (HHV) can now be expressed as

This development does not include energy contributions associated with the stirrer. This effect could be included if more precision is desired, but the calculations become somewhat cumbersome. Other corrections have also been neglected since they are minor effects and are difficult to determine in the current setting. These effects include corrections due to the heat of formation of sulfuric acid (H2SO4) and for the heat of formation of nitric acid (HNO3).
Some of the data required to determine the heating value of a fuel have been previously determined.
Energy equivalent factor of the calorimeter (mCp)b
+ (mCp)w = 2402 cal/°C
Heat of combustion of the gelatin capsule uc =
4600 cal/g
"Heat of combustion" of the fuse wire ufw = 2.3
cal/cm = 1400 cal/g
If the length of wire has been measured, note that the energy content of the fuse wire is equal to the product of the combusted length of fuse wire and the value of ufw given above (not actually a specific internal energy).
Additional Questions and Activities
OXYGEN BOMB CALORIMETER DATA SHEET
|
|
|
|
|
|
|
|
|
|
|
|
|
|
|
|
|
|
|
|
|
|
|
|
|
|
|
|
|
|
|
|
|
|
|
|
|
|
|
|
|
|
|
|
|
|
|
|
|
|
|
|
|
|
|
|
|
|
|
|
|
|
|
|
|
|
|
|
|
|
|
|
|
|
|
|
|
|
|
|
|
|
|
|
|
|
|
|
|
|
|
|
|
|
|