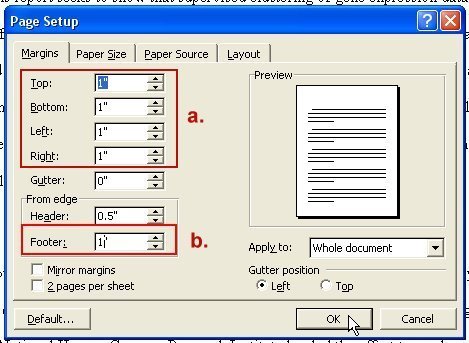
Nav:

Home

Dummy Report

Margins

Spacing

Numbering


Adding Margins to the Report

Adding margins to a document is very straightforward. We want to achieve three things: First we want to adjust the default margins to one inch for all sides. We will also want to specify the margins for our numbering. Finally, we want to specify a two inches margin for title pages. Here we will walk through the creation of the introductory sections of the paper (From the Letter of Transmittal to the Introduction) and the body of the paper. The procedure should be repeated for the last sections on the paper and the Appendix.  

  1. On a new page, click on the File menu and enter Page Setup (see Figure 1).


Figure 1. Entering Page Setup.

  1. On Page Setup we make the following adjustments:
    1. Set the Top margin,Bottom, Left, and Right margins to one inch (see Figure 2a).
    2. Set the Footer margin to one inch (see Figure 2b).
    3. Click OK


Figure 2. Page Setup options.

We have now the margins ready for writing the cover letter. The next step is to add the Abstract. We do the following:

  1. After placing the cursor at the end of the cover letter. Go to the Insert menu and click on "Break..." (see Figure 3a).
  2. Select Page Break and click OK (see Figure 3b).


Figure 3. Adding a page break.

Adding a page break is very useful since it defines a new page with out having to add blank spaces or carriage returns. Also, the text will not move down even if you decide to add additional lines in the previous page. I personally use this feature a lot so I use the keyboard shortcut Ctrl + Enter which automatically adds a new page break. Now is time to adjust the margins for the Abstract. We proceed as follows:

  1. Click on the File menu and enter Page Setup
  2. On Page Setup we make the following adjustments:
    1. Set the Top margin to two inches (see Figure 4a).
    2. On the "Apply to" text box select the option "This point forward". Omitting this step will lead to a global document modification (i.e. all the pages will have two inch margins). (see Figure 4b).
    3. Click OK


Figure 4. Page Setup options for a new section.

The three sections after the after the Abstract (Table of Contents, Figures and Graphs, and first page of the Introduction) have all the same margins so we just add breaks after each of them. We, however, assume that the Table of Contents occupies only one page. If that assumption applies, we perform the following:

  1. Add new page breaks after the Abstract, Table of Contents, and Figures and Graphs (see steps 3 and 4)
  2. Type through the first page of the Introduction (or insert dummy text) until Word automatically creates a new page

We are now in the second page of the Introduction. This page needs a margin of one inch only so we go through these steps:

  1. Once the cursor is on the second page, again go to the File menu and click on Page Setup
  2. Make the following adjustments:
    1. Set the Top margin to one inch
    2. On the "Apply to" text box select the option "This point forward"
    3. Click OK

Assuming that the Introduction has only two pages, we are ready to start the body of the paper. Now pay close attention to the next step:

  1. After placing the cursor at the end of the cover letter. Go to the Insert menu and click on "Break..." (see Figure 5a).
  2. Select Next Page under Section Break Types and click OK (see Figure 5b).


Figure 5. Adding a section break.

It is extremely important to notice the difference between a page break and a section break since it will become critical once we discuss about inserting numbering to the long report. A section break allows us to change the numbering of each section independently. A page break justs adds a new page in the same section. So, please, take close attention each time we add a section break

Now, we need to the margins for the first page of the body:

  1. Click on the File menu and enter Page Setup
  2. On Page Setup we make the following adjustments:
    1. Set the Top margin to two inches.
    2. On the "Apply to" text box select the option "This point forward" (see Step 6).
    3. Click OK
  3. Type through the first page of the Body (or insert dummy text) until Word automatically creates a new page

After going to a new page, we have to adjust the margins of the second page:

  1. Once the cursor is on the second page, again go to the File menu and click on Page Setup
  2. Make the following adjustments:
    1. Set the Top margin to one inch
    2. On the "Apply to" text box select the option "This point forward".
    3. Click OK

[Back to top]


Home - Page Numbering - MarginsSpacing - Dummy Report
Website Design by Esteban Fiallos