Adding Numbering to the Dummy/Long Report
(In 30 steps)
We would have liked to start by saying that adding page numbering to
the long report using word is a straightforward process. However,
we are obliged to say that inserting complex page numberings in
Word is not an straightforward process. We will
give you step by step procedure that will enable you to accomplish
this. Take close attention to each step and screenshot and make
sure the Word sections we create match the sections in your
paper.
At this point, we assume that you have completed your
dummy report, or your long report (which explains why this
is the last section of the site). In our example, the body section
is seven pages long. Adjustments should be made for longer and
shorter reports (on the continuity of the numbering).
Let us begin then:
- Got to the Insert menu and click on Page Numbers. In
the Page Numbers window, make the following adjustments
(see Figure 1):
- Set the alignment to "Center".
- Uncheck the box "Show number on first page".
- Click on "Format..." and change the Number
Format to "i, ii, iii, ..."
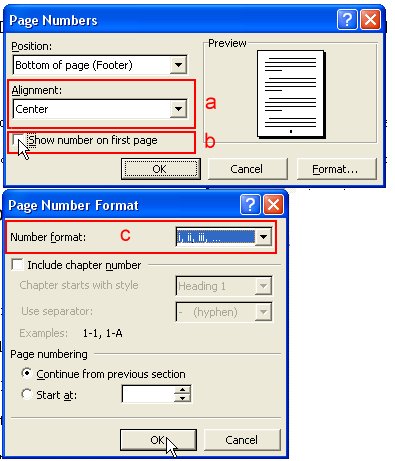
Figure 1. Using the Page Numbering menu.
The previous step is the easiest part of the process. However, this
feature is not complex enough to help us with the rest of the
numbering in the paper. However, if done correctly, this will
take care of the numbering of the Letter of Transmittal, Abstract,
Table of Contents, Figures and Tables, and Introduction. The
bottom of the last page of the introduction should look like
this by now:
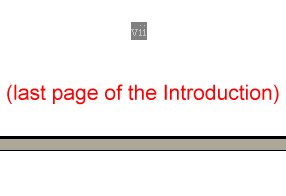
Figure 2. Screenshot of the last page of the Introduction.
Now, we have to change the numbering to start the body:
- Place the cursor at the end of the last page of the Introduction. Go to the Insert menu and click on Break
- Select Next Page under Section Break Types and click
OK (see Figure 3).
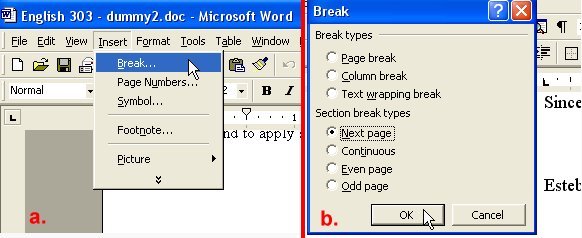
Figure 3. Adding a section break.
A section break will allow us to use a different numbering for
the body of the report. Section breaks were briefly discussed
in the margins section.
- Press the delete key until the first page of the body
occupies the current page.
We might be tempted to add a continuous section break instead. However, this method guarantees that
section 2 starts at the beginning of the body. The advanced
header and footer editing is coming next. Please follow the
steps carefully:
- Go to the View menu and click on Header and Footer.
After this step, you should have the following on your screen:
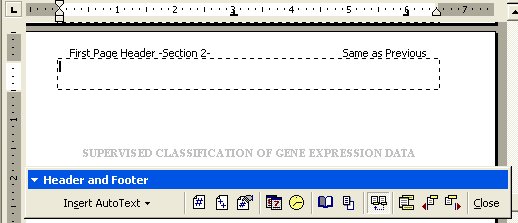
Figure 4. The Header and Footer toolbar (Word 2000).
Since we will use this feature through the rest of the paper we will describe it briefly.
The header and footer are usually hidden from the user and are
used for additional page elements like page numbering and footnotes.
The Header and Footer toolbar allows the user to fully customize
the headers, including numbering.
The "Same as Previous" indicator at the top right
corner, indicates that, currently, the header and footer for
section 2 is set to be equivalent to the header and footer of
section 1. Since we want a different numbering for section 2,
we will remove this configuration on the next step:
- Go to the bottom of the first page and place the cursor in the footer.
- Remove the "Same as Previous" indicator by pressing the "Link to Previous" button (see Figure 5).
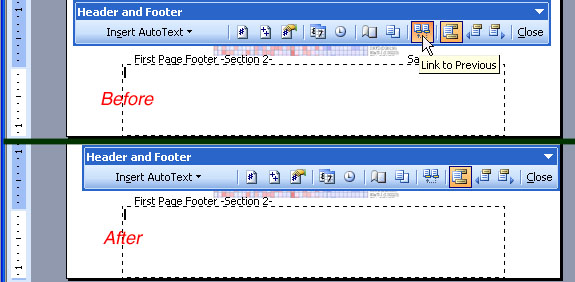
Figure 5. The "Link to Previous" button (Word XP).
- As done with normal text, center the cursor to the middle of the header and type "1" (see Figure 6).
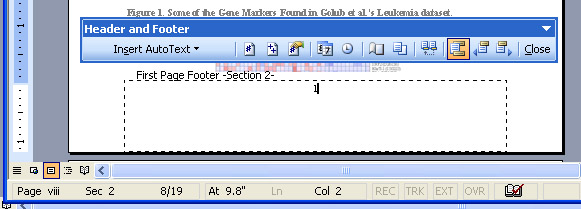
Figure 6. Adding numbering to the first page of the body.
If you wanted to be more technical you could have added numbering for one page only.
This way the indicator bar would change from (Page viii Sec 2) to (Page 1 Sec2). We leave this improvement
to the student.
We have numbered the first page of the body. We have to change the placement of the page numbers for the second page:
- Go to the header of the second page of the body and remove the link to the previous page using the "Link to Previous" button.
- Click on the "Format Page number" button on the Header and Footer toolbar (see Figure 7).
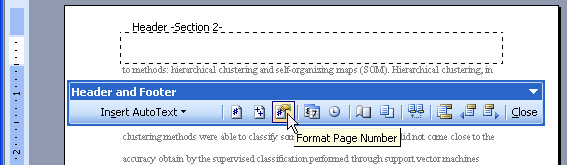
Figure 7. The "Format Page number" button.
- In the page number format dialog, do the following (see Figure 8):
- select the number format (1,2,3,...).
- Change the "Page Numbering" section to Start at 1 and click OK.
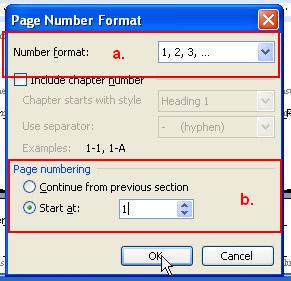
Figure 8. The Page Number Format dialog.
You might be tempted to start at 2, but remember, Section 2 (i.e. the Body) does start at 1, we just didn't specify it on the first page. Now that we changed the format, we'll insert the numbering itself:
- As with normal text, right-align the cursor so the page number will appear on the right side of the page.
- Click on the "Insert Page number" button on the Header and Footer toolbar (see Figure 9).
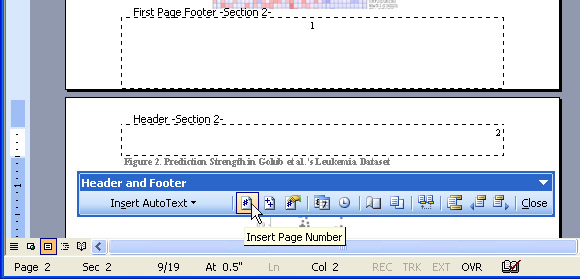
Figure 8. Inserting page numbers with the Header and Footer toolbar.
Now we are going to make sure that the footer of the second page of the body does not contain left-over numbering from the previous sections.
-
Go to the bottom of the second page and place the cursor in the footer.
- Remove the "Same as Previous" indicator by pressing the "Link to Previous" button.
- Delete any numbering appearing on the footer (if any).
If you followed the steps carefully you should have the first sections and the body of the paper with correct numbering. Now, when we reach the first page of the Conclusion, we have to switch the numbering again. To do this, we will create another section:
- Place the cursor at the end of the last page of the Body. Go to the Insert menu and click on Break
- Select Next Page under Section Break Types and click OK
- Press the delete key until the first page of the Conclusion occupies the current page.
- Make the following adjustments to the Conclusion's header and footer:
- Remove the "Same as Previous" indicator in the header by pressing the "Link to Previous" button (remove numbering if any).
- Remove the "Same as Previous" indicator in the footer by pressing the "Link to Previous" button.
- Remove numbering in the footer (if any).
- Center the cursor in the footer and insert the page number following the last page of the body (in our example, it would be 8).
Here we will use our assumption. Since, we create a new section, the numbering starts all over again and we have to input the pages manually. Again, this is the reason you should have finished the dummy report before applying the numbering.
We repeat the same process for the Recommendations
- Place the cursor at the end of the Conclusion. Go to the Insert menu and click on Break
- Select Next Page under Section Break Types and click OK
- Press the delete key until the Recommendations section occupies the current page.
- Make the following adjustments to the Recommendations' header and footer:
- Remove the "Same as Previous" indicator in the header by pressing the "Link to Previous" button (remove numbering if any).
- Remove numbering in the header (if any).
- Remove the "Same as Previous" indicator in the footer by pressing the "Link to Previous" button.
- Center the cursor in the footer and insert the page number following the last page of the body (in our example, it would be 9).
We will repeat the same process for the first page of the Sources so I won't list all the steps in detail.
- Add a new section for the Sources.
- Manually add the corresponding page number to the footer of the Sources.
The second page of the sources is different because the numbering is applied at the top right corner of the page. I will emphasize this by describing the steps in more detail.
- Go to the second page of the Sources and make the following adjustments:
- Remove the link to the previous page in the the header using the "Link to Previous" button.
- As with normal text, right-align the cursor so the page number will appear on the right side of the header and insert the corresponding number.
- Remove the "Same as Previous" indicator in the footer by pressing the "Link to Previous" button.
- Delete any numbering appearing on the footer (if any).
If you have an Appendix section with more than two pages you should do the following:
- Add a new section for the Appendix.
- Manually add the corresponding page number to the footer of the Appendix.
Since we are assuming that you have more than two pages on this section, we will use the Header and Footer toolbar to insert the numbering in subsequent pages. We proceed mostly as we did with the second page of the body. The modification is emphasized with bold.
- Make the following adjustments to the second page of the Appendix (and subsequent pages).
- Remove the link to the previous page using the "Link to Previous" button.
- Click on the "Format Page number" button on the Header and Footer toolbar (see step 10).
- In the page number format dialog, do the following (see step 11):
- select the number format (1,2,3,...).
- Change the "Page Numbering" section to Start at the correspondent page and click OK.
- As with normal text, right-align the cursor so the page number will appear on the right side of the page.
- Click on the "Insert Page number" button on the Header and Footer toolbar.
- Go to the bottom of the second page and place the cursor in the footer.
- Delete any numbering appearing on the footer (if any).
So it ends our procedure. You might find a more elegant solution to it. If you do, let Dr. Magee and the webmaster now about it so we can update this webpage. It can be implemented in five minutes once you know the steps. If you think is too much effort, reflect on the time it took to create this webpage so you could try it.
[Back to top]
|