![]()
![]()
![]()
![]()
![]()
![]()
![]()
![]()
Layout of the Array List Data Structure
Below is a screenshot of the Watson Data Structures Lab about array lists. As you can see, the major sections of the lab are numbered and explained below the image.
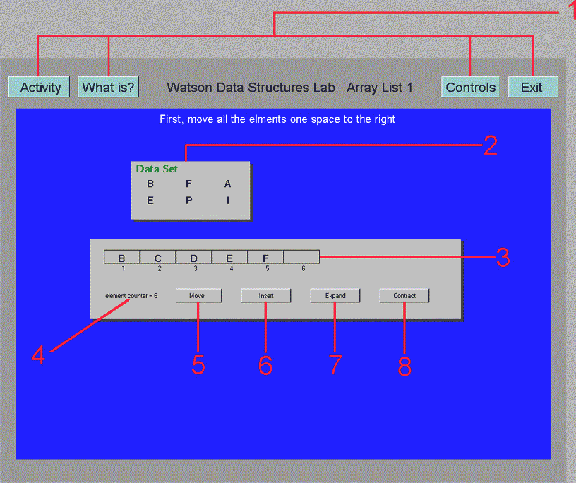
- Watson Control Bar - The common Watson control bar for all applications. This bar contains all the functions to select an activity and get important information about the lab.
- Data Set - Contains all the data or information which may be used within an activity.
- Array List - An array structure with a fixed maximum length.
- Element counter - It keeps up with how many elements are in the array.
- Move Button - Moves a value from one element of the array to another one.
- Insert Button - Inserts a value into the array from temp variable or the data set.
- Expand Button - Increases the size of an array.
- Contract Button - Decreases the size of an array.
The move and insert operations on an array list are very useful for moving items around within the array. The animated figure below demonstrates how these two functions work.
Array List 1 Activity
- Click on the button labeled 'Activity'.
- Select the Array List 1 activity and click on the 'OK' button to begin the program.
- Click on the 'OK' button after viewing the activity description for the array list 1 exercise.
- Move the cursor over the button labeled 'Move' and click. Then move your cursor to the letter 'F' and click on it.
- Next, move your cursor to the empty cell above the number 6 and click in the cell.
- Move the cursor over the button labeled 'Move' and click. Then move your cursor to the letter 'E' and click on it.
- Next, move your cursor to the empty cell above the number 5 and click in the cell.
- Move the cursor over the button labeled 'Move' and click. Then move your cursor to the letter 'D' and click on it.
- Next, move your cursor to the empty cell above the number 4 and click in the cell.
- Move the cursor over the button labeled 'Move' and click. Then move your cursor to the letter 'C' and click on it.
- Next, move your cursor to the empty cell above the number 3 and click in the cell.
- Move the cursor over the button labeled 'Move' and click. Then move your cursor to the letter 'B' and click on it.
- Next, move your cursor to the empty cell above the number 2 and click in the cell.
- Move the cursor over the button labeled 'Insert' and click. Then move your cursor to the 'Data Set' window and click on the letter 'A' and click on it.
- Next, move your cursor to the empty cell above the number 1 and click in the cell.
- Press any key on the keyboard to answer the questionnaire at the top of the screen.
- Choose one of the three choices listed.